
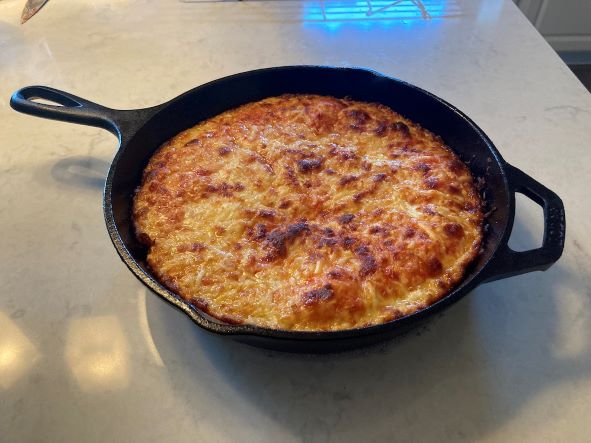
This deep dish pizza has a crispy cheese ring with a bright tomato sauce and perfectly cooked crust! Once you master this recipe, family pizza nights will never be the same.
Homemade pizza has become a weekly staple in our house. I, my wife, and even my kids love this recipe and we cook it for friends and family often. Using a cast iron skillet is imperative to achieve the crispy crust and cheese ring that takes this pizza to a whole new level.
Why should you make this recipe:
- The dough recipe here is very easy and requires very little to no kneading and zero specialized tools
- Cast Iron Pizzas are also very forgiving to the home cook, you risk of burning the crust or ruining the dough is small
- Limitless options for toppings and sauces
- I use pre-shredded mozzarellas for the perfect blend of texture and taste
- Easily scaled up to feed a larger family or crowd
Ideas for customizing this recipe:
- Practically limited by your imagination only!
- Add in some dried or fresh Rosemary to the dough for a taste similar to focaccia
- Change up your sauce; use olive oil and garlic or alfredo for a delicious white pizza
- Leave off the cheese and sauce; dot the dough with your fingers before the second proof and make an easy focaccia
Tools needed to make better homemade pizza:
- A heavy 10″ cast iron skillet; any brand or vintage will do but it must be cast iron
- I have tried this recipe in deep dish “pizza” pans, and it sticks like crazy and you do not have the option of finishing the bottom crust on the stovetop (which is necessary 90% of the time)
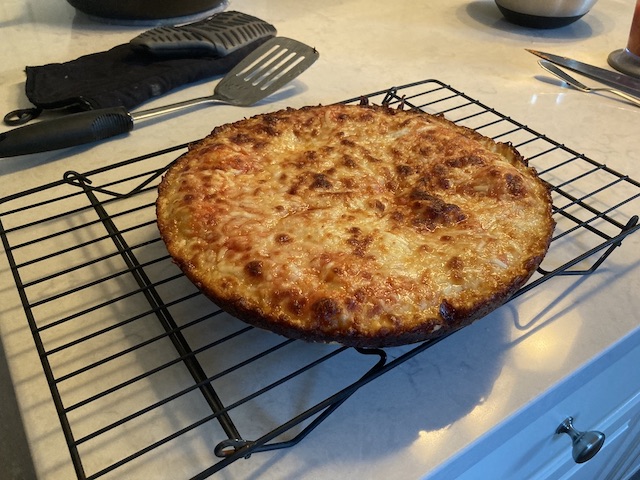
- A wire cooling rack; while not ABSOLUTELY essential, a wire rack helps keep the crust from getting soggy while you wait for the pizza to cool off so you don’t obliterate the roof of your mouth! 🔥
How to make Better Homemade Deep Dish Pizza using a Cast Iron Skillet
In this recipe, we will make our dough and sauce from scratch using very common household ingredients. The dough proofs in the refrigerator overnight for a nice slow rise that has incredible flavor. A bright and delicious sauce is made in minutes and will tingle your tastebuds. Pre-shredded cheese makes for easy prep on weeknights and utilizes two types of mozzarella for classic taste and texture.
Make the Dough:
- The dough for this recipe really needs to be made a day or more ahead of time and allowed to proof in the fridge. I always mix this dough by hand, but you are more than welcome to use a stand mixer or a heavy duty food processor.
- In a large mixing bowl with a lid, whisk your dry ingredients together, then add your olive oil and water.
- Mix by hand until no dry spots remain (this dough is REALLY messy and will stick like crazy)
- Cover and let sit for 15 minutes
- Using a wet hand, apply 4 to 5 strength building folds
- Cover and let sit for another 15 minutes
- With a wet hand, repeat the strength building folds
- Divide and place into oiled containers with lids
- I have tried dividing this dough AFTER proofing in the refrigerator and it never rises as high as when it’s divided prior to proofing…ymmv
- Place in fridge and let proof for AT LEAST 24 hours
Make the Sauce:
- Any type of whole peeled canned tomatoes will work for this recipe. Food snobs and purists will tell you that you MUST use “San Marzano” tomatoes but I’m not paying those prices and I am not trying to impress anyone. I have found that whole peeled tomatoes from a certain big box retail chain based in Arkansas has OUTSTANDING store brand cans of whole peeled tomatoes…(not kidding, they’re phenomenal and cheap!)
- Strain your tomatoes and toss out any skins or extra solids. This sauce uses only the whole tomato.
- Add in some salt, olive oil, and red pepper flakes
- Blend until just before smooth, we still want a little texture here, not tomato soup
The Cheese:
- Grated parmesan goes on top of the layer of sauce before adding on the Mozzarella
- For the mozzarella, combine 1 bag (2 Cups or 8 oz.) of “Low Moisture Part-Skim” mozzarella and the same of “Low Moisture Whole Milk” mozzarella. I usually pour both bags into a gallon sized zip top bag and shake to evenly. distribute. The moisture content is important here so that the cheese does not turn into cheese soup on top of the crust. If you use high moisture content, reduce the amount of cheese by half but ymmv.
- If you want to shred your own cheese, by all means do so, but I would still use half part skim and half whole milk. The flavor that this combination creates is really exquisite.
Get Prepped for Cooking:
- 1 hour to 90 minutes before cooking, take your dough out of the refrigerator and carefully scoop into a WELL oiled cast iron skillet
- Using oiled fingers, spread and stretch the dough until the bottom of the skillet is covered. This does not have to be perfect as the dough will be stiff from the fridge, but try as best as you can without tearing holes in the dough.
- Cover with plastic wrap and set aside until ready to cook
Time to Cook your Pizza:
- About 30 minutes prior to baking, preheat your oven to 500° or 475° if using convection
- Once ready to cook, heat your skillet with dough on your stovetop over medium heat
- After you turn the heat on, spread on your sauce to your desired taste. This dough is hearty so you can load up on sauce if you like!
- On top of the sauce, sprinkle a thin layer of grated parmesan cheese
- Now it’s time for the mozzarella; sprinkle on a thick layer of mozzarella that covers the dough edge to edge
- Sprinkle a little extra cheese around the rim of the dough to create the most delicious crispy cheese ring ever
- Take the skillet off the stovetop and bake for 10-12 minutes or until your cheese is bubbly and golden brown
Finishing things up:
- Once cooked to your desired golden brown, take the skillet out of the oven and put it right back on the stovetop
- Turn your heat BACK ON to medium to finish cooking the bottom of the crust. The cooking time here varies quite a bit depending on the thickness of your skillet. A thinner vintage skillet might only take an extra two or three minutes whereas a newer thicker skillet might take another six to eight minutes! You also have a much greater risk of burning the bottom of the crust if your heat is too high or you leave the skillet on the range too long.
- After a minute or so on the stovetop, use a butter knife and scrape the edges to release the cheese ring from the pan
- Use a hamburger flipper to check the bottom of the crust for doneness
- When you have a deep golden brown, remove the pizza from the cast iron pan and move to a wire cooling rack
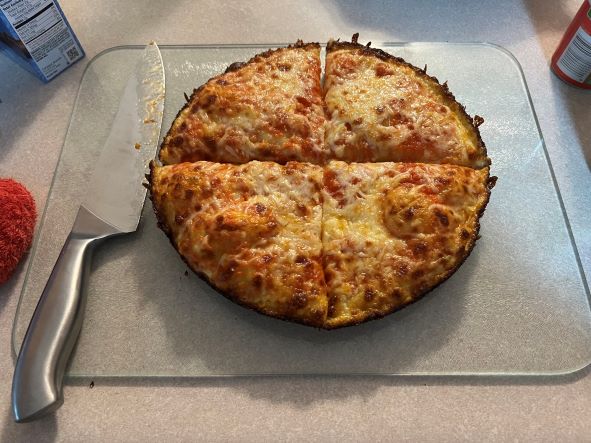
- Let cool for at least five minutes before moving to a cutting board to portion and serve
Enjoy your Deep Dish Pan Pizza and let me know how it turned out!!
Better Homemade Deep Dish Pan Pizza
This deep dish pizza has a crispy cheese ring with a bright tomato sauce and perfectly cooked crust! Once you master this recipe, family pizza nights will never be the same.
Equipment
- 1 10 inch Cast Iron Skillet
- 1 Wire Cooling Rack
- 1 Metal Pastry Spatula or Butter Knife
- 1 Hamburger Flipper/Spatula
- 1 Blender or Immersion Blender for blending tomatoes
Ingredients
Dough
- 360 grams All Purpose or Bread Flour
- 1 ½ tsp Active Dry Yeast instant, active, any yeast will work
- 1 ½ tsp Kosher Salt if using table salt, reduce by half
- 1 ½ tsp Granulated Sugar for browning of the dough
- 1 ½ TBSP Olive Oil
- 1 Cup plus 1 Tbsp Water 255 grams
Sauce
- 1 28 oz Canned Whole Peeled Tomatoes drained and remaining peels removed
- 2 tbsp Olive Oil
- 1 tsp Table Salt
- 1 tsp Red Pepper Flakes option
Cheese Mix
- 8 oz Shredded Low Moisture Part Skim Mozzarella 2 Cups
- 8 oz Shredded Low Moisture Whole Milk Mozzarella
Additional
- 2 tbsp Olive Oil for skillet to help stretch dough
- 1 tbsp Olive Oil for oiling dough containers
Instructions
To Make the Dough
- In a large mixing bowl, whisk together all dry ingredients360 grams All Purpose or Bread Flour, 1 ½ tsp Active Dry Yeast, 1 ½ tsp Kosher Salt, 1 ½ tsp Granulated Sugar
- Add in water and olive oil1 ½ TBSP Olive Oil, 1 Cup plus 1 Tbsp Water
- Mix by hand until no dry spots remain
- Cover and let sit at room temperature for 15 minutes
- Using a wet hand, complete 4 or 5 dough stretch and folds
- Cover and let sit another 15 minutes
- Complete another 4 stretch and folds
- Divide into 2 dough balls and place into oiled containers making sure to oil all side of the dough and container (glass is best)1 tbsp Olive Oil
- Cover and place in refrigerator for AT LEAST 24 hours
The Sauce
- Drain and remove extra peels from can of whole peeled tomatoes1 28 oz Canned Whole Peeled Tomatoes
- Add tomatoes to a blender
- Add in salt, olive oil, and red pepper flakes if using
- Blend until just smooth
Cheese Mix
- In a large zip top bag, combine both bags of shredded mozzarella and shake well to evenly distribute8 oz Shredded Low Moisture Part Skim Mozzarella, 8 oz Shredded Low Moisture Whole Milk Mozzarella
Prep for Cooking
- Remove dough from refrigerator
- Add one tablespoon of Olive Oil to a cold cast iron skillet
- Remove the dough from it's container and place in the skillet
- Stretch dough in a circular motion until the dough covers the bottom of the skillet
- Cover with plastic wrap and set aside at room temperature for 90 minutes
Cooking
- 30 minutes prior to cooking, preheat your oven to 500° Fahrenheit or 475° if using the convection setting
- Remove plastic wrap from your cast iron skillet and put skillet on stovetop
- Turn heat to medium
- While heating up, top your dough with desired amount of sauce
- Sprinkle on a layer of grated parmesan cheese
- Add a layer of mozzarella cheese making sure to add a little extra around the edges
- Place in oven and bake for 12 minutes or until cheese is bubbly and golden brown
- Remove from oven and put the skillet back on the stovetop, turning heat back on to medium
- Using a butter or pastry knife, release the pizza from the sides of the pan, leaving pizza in skillet
- Check the bottom of the crust for doneness
- Once desired doneness is achieved, use a hamburger flipper to remove pizza and transfer to a wire cooling rack
- Let cool for 5 minutes
- Transfer pizza to a cutting board, cut, serve, and enjoy!!!
*I am part of the Amazon affiliate program and earn a small commission from items purchased via my links*
Please follow and like us: